

Whether it’s a backyard barbecue, an outdoor concert, or an impromptu block party, glow sticks have an incredible ability to illuminate the magic of summer nights. As highly portable, self-contained chemical experiments in a tube, they’re also perfect STEM tools! In this installment of Camp Edvotek, we’ll introduce the science behind glow sticks and walk you through a camp-friendly experiment exploring the relationship between temperature and chemical reactions.
What are Glow Sticks?
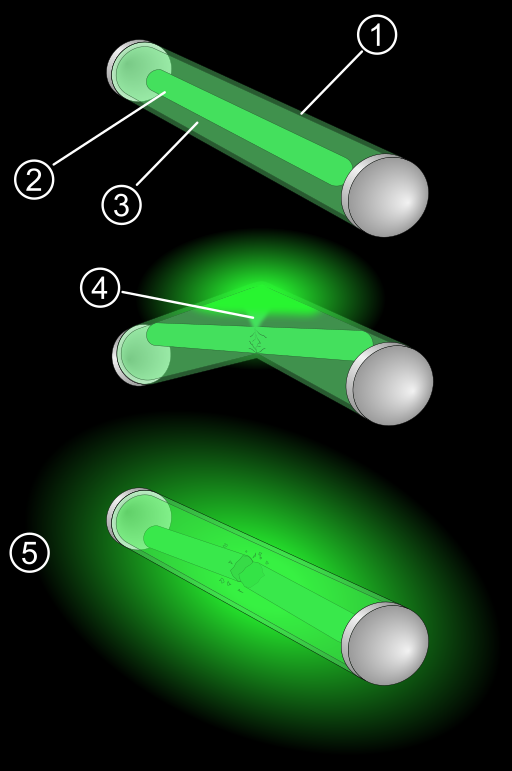
Glow sticks are self-contained, short-term light sources. Each glow stick consists of a tiny, brittle container within a flexible outer container. The outer container holds dye solutions (different dyes are used depending on the color, intensity, and longevity of the light), while the inner container typically holds hydrogen peroxide. When the outer container is flexed, the inner container breaks, allowing these solutions to combine and produce light.
The Reaction
Glow sticks are chemical reactions waiting to happen! They contain potential energy in the form of chemicals: fluorescent dyes and hydrogen peroxide. When you crack the glow stick, the chemicals react to form new substances and release excess energy in the form of light. This process is called chemiluminescence.
Chemiluminescence starts with combining two compounds, A and B, to give a product C. Unlike most chemical reactions, product C converts to another product, which is produced in an electronically excited state:
A + B → C
C → D*
D* emits a photon (hv) to return to a more stable state
D* →D + hv
A typical commercial glow stick holds a hydrogen peroxide solution, a phenyl oxalate ester, and a fluorescent dye. Here’s what happens when the two solutions combine: (1) The hydrogen peroxide oxidizes the phenyl oxalate ester, resulting in phenol and a high energy but unstable peroxy acid ester. (2) The peroxy acid ester decomposes, resulting in additional phenol and a cyclic peroxy compound. (3) The cyclic peroxy compound decomposes to carbon dioxide. (4) This decomposition releases energy to the dye which causes electrons in the dye to jump into a higher energy level. (5) As these electrons fall back down they release energy in the form of light. In modern glow sticks, different dyes produce various colors such as rhodamine B for red, 9,10-bis(phenylethynyl)anthracene for green, and 9,10-diphenylanthracene for blue.
The Experiment
What you’ll need (per group):
– 3 glow sticks. Control for size and color (i.e. each group should have the same size and color.)
– 3 containers that can conserve temperatures of hot, cold, and room temperature for 3 minutes. (This can span the gamut of glass beakers with the “hot” beaker holding boiling water on a heating plate to foam cups with warm water from a tap and everything in between.)
– Ice
– Water
– Permanent and Waterproof Marker
– Timer
– Tongs and oven mitts (depending on how hot your “hot” water will be)
– Thermometer (optional)
- Have each group label their cups and glow sticks with “RT”, “Cold” and “Hot”.
- Fill the “RT” cup with water that has been sitting at room temperature, the “Cold” cup with water and ice, and the “Hot” cup with hot water.
- (Optional) Record the starting temperature of each cup.
- Bend and shake each glow stick to activate them.
- Take a picture of the 3 activated sticks side by side.
- Place each stick in its appropriate cup.
- Leave glow sticks submerged for 3 minutes. While you’re waiting, write down a hypothesis about which stick will be brightest.
- Remove the glow sticks, place them side by side, and again take a picture.
- (Optional) Record the finishing temperature of each cup.
What’s Happening
High temperature in the hot cup increases the average speed of the reactant molecules. As more molecules move faster, the number of molecules moving fast enough to react increases, which results in the faster formation of products. Conversely in the cold cup, few molecules collide with enough energy to overcome the potential energy barrier thereby creating a much slower reaction rate. In the glow sticks this translates to the hot glow stick shining brighter – although the glow will fade faster because the reaction consumes the chemicals more rapidly.
More Experiments!
Compare results across the classroom. Remember that different colors are produced by different types of dye. Do some colors show stronger temperature contrasts than others?
Play with time. Wait 10 minutes after step 8. Is the contrast still as noticeable? Try an overnight experiment with glow sticks in the freezer, fridge, air conditioning, and outside. Which reaction is still happening the next day?
Have access to liquid nitrogen? At -321°F the experimental environment is so cold that it stops the reaction, making the glow stick go dark. But don’t worry—warming the tube will bring it
back to life.
Have an analytical balance and advanced campers? Measure the glow sticks after step 1 and after step 9 to explore the law of conservation of mass.
Share your results with us throughout this Camp Edvotek summer by tagging us on Instagram, Facebook, or X! Stay tuned for more Camp Edvotek activities all summer long. Check out our Summer Camp Guide to earn badges and complete fun activities and experiments.
Even More About Glow Sticks (and Science)
While most people associate glow sticks with the novelty market, they also have more serious uses. Glow sticks can save lives. For example, flotation vests equipped with glow sticks help rescuers find people lost at sea. Waterproof, battery-free, oxygen-independent, generating negligible heat, producing no spark or flame, tolerating high pressures, inexpensive, and reasonably disposable, these tools are used extensively by military and emergency services. As a result, research continues into the chemistry behind glow sticks to make them brighter, longer lasting, and safer. Safety improvements over the years include replacing harmful oxalates with safer alternatives. Most recently, companies like LUX BIO are investigating creating reusable and nontoxic glow sticks based on bioluminescence.
Ready to further explore chemiluminescence? See how the luminol reaction helps criminal detectives solve crimes with our Forensics Enhancement Technique Kit. Or delve into the molecular biology of bioluminescence with our popular Green Fluorecent Protein kits.
Title image attribution: domdomegg, CC BY 4.0 https://creativecommons.org/licenses/by/4.0, via Wikimedia Commons
