

What are pipettes?
Pipettes are a large group of laboratory tools that scientists use to measure and manipulate liquids.
The simplest pipettes closely resemble eye droppers with squeezable bulbs. These are known as Pasteur pipettes after their inventor Louis Pasteur. While Pasteur’s goal was to protect from contamination, Pasteur pipettes can also be used to make approximate measurements.
Graduated pipettes are similar to Pasteur pipettes but designed for higher volumes. They tend to be used when preparing general use buffers, performing analytical chemistry experiments, and working with cells. To draw in large volumes most graduated pipettes are attached to an electronic pump.

For smaller volume reactions – such as those required for most molecular and microbial biology experiments – scientists use micropipettes. These were originally miniature versions of a graduated pipette attached to a bulb or even a suction piece.
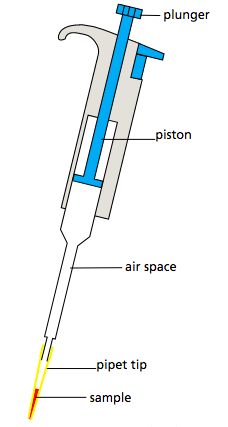
However, today, most labs are equipped with piston-driven micropipettes.
Continued innovation has created several additional pipettes. For example, multichannel pipettes can hold a whole row of tips which allows scientists to prepare multiple samples at once. Positive displacement pipettes have disposable pistons for when scientists are working with hot, hazardous, thick, or corrosive solutions.
Robotic pipettes also exist. At their simplest, robotic pipettes repeatedly release a specified volume to multiple tubes or wells (a process known as aliquoting) in response to a light tap or time interval. More advanced robot pipettes take advantage of artificial intelligence to carry out whole experiments – measuring and mixing multiple volumes, examining the results, and then revising the volumes based on their interpretation!
How do you use an adjustable micropipette?
There are five major steps in pipetting. They are:
- PREPARE: Set the volume by dialing the pipette to the appropriate value and adding a tip.
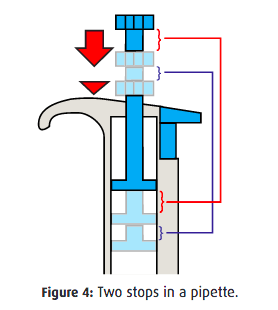
- ASPIRATE: Create a vacuum by pushing the plunger down and placing the tip into the sample. Then slowly release the plunger. Finally, pause to make sure the liquid has moved into the tip. This step is slightly complicated by the fact that most micropipettes have two plunger positions. Depressing the button to the first “soft” stop results in the correct amount being aspirated. However, depressing the button to the second “hard” stop creates a larger vacuum than desired.
- DISPENSE: Place the tip where you want to add the sample and push the plunger down. This increases the pressure inside the pipette which causes the liquid to flow out. However, it also creates a new vacuum so make sure to lift the tip out of the solution before releasing the plunger.
- RE-ASPIRATE and RE-DISPENSE: Repeat steps 2 and 3 if you are pipetting the same amount from the same start solution. Change tips as needed.
- PURGE: Ensure that all the sample is released by pushing the plunger down to the second hard stop. After all the liquid has been ejected, remove the pipette and tip from the solution, release the plunger, eject the tip, and finally store the pipette upright in an easy to access location.
In most biotech experiments these five steps are repeated multiple times. Such practice quickly builds pipetting familiarity!
What are the golden rules of pipetting?
- Use the correct pipette for the volume you are pipetting. Micropipettes come in different sizes which have a specific range. Never adjust the volume beyond the upper or lower limit of this range as it can compromise the accuracy of the experiment and the integrity of the pipette. Also, use the correct sized tip for the pipette you are using.
- Switch pipette tips between samples to avoid contamination and if the tip comes in contact with anything other than the samples or sample vessels.
- Keep pipettes vertical or vertically angled with the tip or tip cone facing down. Laying a pipette down that has a liquid-filled tip can contaminate both the sample and pipette. In some cases, it can also damage the pipette.
- For maximum accuracy and to avoid contamination, depress and release the plunger using smooth and slow movements.
- Apply a consistent technique between samples. Small differences in pipetting (the depth that a tip is immersed, the angle that the pipette is held at, the force used to lower the plunger, the speed used to raise the plunger, etc.) can quickly add up to larger differences in volume.
- Remember that you are a key component of the pipetting operation! Practice good ergonomics especially when pipetting multiple times – sit or stand so that you are comfortable and so that you can see your samples. Also wear gloves, a lab coat, and goggles when needed to protect yourself and avoid contamination.
Why do I sometimes see the safety warning “do not mouth pipettes”?
Well into the 1960s, scientists would transfer solutions by treating pipettes like straws and sucking the liquid up to a specified volume. As you can imagine, the practice (called mouth pipetting) was somewhat hazardous even with precautionary filters and safety bulbs! In 1893, a doctor accidentally sucked Typhoid bacteria into his mouth. Much later, Manhattan Project scientist Lawrence Bartell accidentally ingested plutonium using this method. Luckily both lived to tell the tale!
How can my class perfect pipetting?
Pipetting skills can make or break an experiment. Because pipettes are so frequently used in the lab, pipetting quickly becomes second nature. However, the pipetting process can be far from intuitive and fluid at first. Understanding what is happening and reviewing standard practices helps when first introducing pipetting. However, nothing replaces practice. Many of our experiments include practice gel loading solutions for this precise reason. We also have two experiments focus on micropippetting (S-44 and S-45) that allow students to practice, evaluate, and refine this essential skill.


3 comments
Comments are closed.