

Cloning, plasmid construction, and plasmid extraction are all some of the major topics and methods in biotechnology. This is one of our more in-depth and advanced experiments, as it exposes students to several different experimental methods. In this blog post, I’ll discuss Experiment 301 and some associated questions about this experiment.
What will I achieve through this experiment?
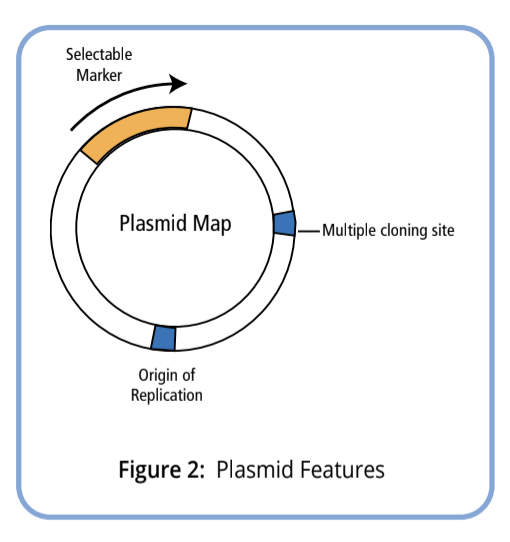
In this experiment, you will create recombinant DNA. First, you’ll ligate (“glue” together) linearized plasmid DNA with a kanamycin resistance gene. Then, this plasmid will be inserted into a host bacteria and grown onto selective media in order to isolate the desired DNA. To clone this plasmid, an isolated colony containing the recombinant DNA is cultured in selective media again, resulting in more copies of these recombinant DNA containing hosts. The plasmids are then isolated and purified. After that they are then examined through restriction enzyme digestion and gel electrophoresis to visualize and analyze the plasmid and the gene that was ligated into the plasmid!
Module 1: Ligating the Plasmid Vector to the kanR Gene Fragment
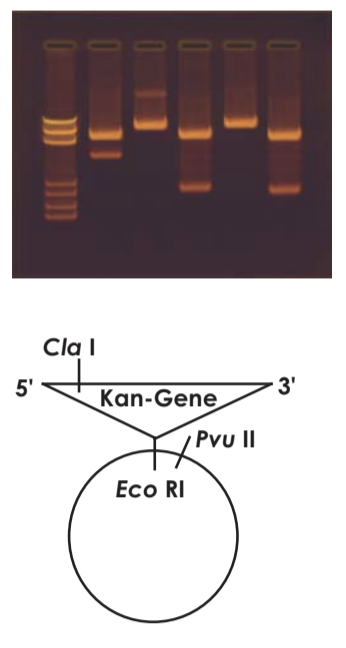
The first step in this module is to ligate the plasmid DNA with the kanR gene. This gene is a kanamycin resistance gene, which is used in this experiment to selectively isolate the desired plasmid containing hosts. The term “ligate” refers to the enzyme ligase. Ligase enzymes act like glue, joining together complementary ends of fragmented DNA to make a larger segment of DNA. Ligase in this experiment is used to combine the DNA fragments with the kanamycin resistance genes which then becomes known as the “recombinant DNA”. There are multiple kinds of ligase enzymes, but in this experiment, the ligase being used is T4 DNA Ligase. T4 DNA Ligase works by joining together complementary 3’ and 5’ end pieces of DNA, and creating a phosphodiester bond between the two to combine them together. This ligation reaction needs to happen at room temperature for an hour or alternatively, 16ºC for 30 minutes, after which it is loaded onto an agarose gel to verify that the ligation reaction occurred.
Module 2: Transformation of the Recombinant DNA into E. coli
Once students have verified their ligation reactions were successful via gel electrophoresis, it is time to transform the recombinant DNA into the host vector: E. coli. Transformation allows for cells like E. coli cells to become permeable and allow the recombinant DNA plasmid in, which allows for replication of this new plasmid. After the recombinant plasmid has been transformed into the E. coli cells, it will be plated on selective media. Since in Module 1 the plasmid was ligated with an antibiotic resistance gene, we can select the successful transformants by plating the cells onto media containing that antibiotic, in this case Kanamycin. This is a method called selective screening. If colonies grow, it means that the recombinant DNA was successfully inserted into the E. coli vector!
Module 3: Culturing the kanR Transformants
In this module, all it takes is one single colony from Module 2 to be able to clone the recombinant DNA. To do this, a single colony is picked from the plates produced by the ligation reaction transformation. This colony is then resuspended in liquid Luria Broth media containing Kanamycin, and grown overnight at 37ºC to multiply the recombinant DNA plasmid. E. coli is a great vector for recombinant DNA technology because it has a doubling time of about 30 minutes at 37ºC, which will result in an abundance of this recombinant DNA.
Module 4: Extraction of the Recombinant Plasmid DNA
Once the colony from Module 3 has had time to grow, it is time to extract the DNA from all of the cells. To do this, students centrifuge the cells and do a common method of plasmid extraction: alkaline lysis. This is done to disrupt the cell walls and release the plasmid DNA into the media, the cellular debris can then be centrifuged and the supernatant will now contain the plasmid DNA. The rest of the cellular debris will be precipitated, then alcohol is used to further precipitate and isolate the plasmid DNA.
Module 5: Restriction Enzyme Analysis and Electrophoresis
In module 5, the isolated plasmid DNA is then digested with a series of restriction enzymes in order to visualize and confirm the presence of the introduced kanR gene. The restriction enzyme, EcoRI, is used to verify the presence of the kanR gene. The other digestion reactions using PvuII and XhoI can allow you to determine what direction the insert is in and how many inserts there are.
FAQ’s
Q: Why are there no colonies on my ligation plate?
A: Double check that the Kanamycin was added to the plates used in this step, also allow enough incubation time for the colonies to form – at least 16 hours. Also make sure that all of the proper components were added and the steps in the protocol were followed during the transformation.
Q: My bands from the restriction digests look smeared, why is this?
A: Make sure that the digestion reaction took place for the proper amount of time and at the right temperature (60 minutes at 37ºC). Also make sure to stop the digestion reaction as soon as it is finished with the gel loading solution. Make sure that the right percentage agarose gel is being used as well (0.8%).
Q: Why is the pellet from the plasmid extraction so small or not present?
A: If there is no pellet present, then the cells were not lysed correctly during Module 4, and this will need to be repeated. The pellet will be small if the original amount of cells was not enough, the cells pelleted from Module 3 should be about the size of a match head. If it is not this size, add more of the culture and try again.
Q: My ligation transformation didn’t work, what can I do?
If your ligation transformation didn’t work, the Control DNA can be used for the restriction digestion instead of DNA extracted from module 4. These components come in the freezer bag and are the E1, E2 and E3 DNA. This way you can still experience the restriction enzyme digestion component of the lab. You can also snag a colony from a classmate’s plate!
Q: My lab periods are split up, how can I optimize our time?
At the end of Module 1, the control and ligation reaction tubes can be stored in the freezer until needed. At the end of Module 2, the transformation plates can be sealed with parafilm, tape, or in a plastic bag for up to a week. Module 4 has two optional stopping points, at step 10 when the supernatant is being combined with the isopropanol and then at step 17, when the plasmid has been resuspended in the Tris-EDTA Buffer. In both cases, the components can be stored in the freezer until they are needed. For Module 5, the restriction digests can be stored in the freezer for loading in the agarose gel at a later date. Just make sure that you wait until you intend to do the restriction digest to rehydrate the Dryzymes.
Check out this experiment on our website!: https://www.edvotek.com/301
